
What’s the Recommended Chevy 5.3 Oil Capacity?
In real terms and why one trusted number rarely fits every motor. Capacity refers to how much fluid the crankcase and related parts hold when you drain and refill. It varies by exact engine build, filter choice, and setup.
The 2000 Suburban 1500 4×4 example shows the stakes. After topping up, the dipstick barely moved. Two added quarts made the level useful, and a total of six quarts just reached the mark. That pattern suggests a different engine variant or a misfit dipstick, not a failed gauge.
It favors safe, repeatable methods — staged fills and dipstick confirmation — over memorizing a single spec. Expect variation across model years and truck or SUV applications in the United States.
Watch for two common gotchas: replacing the filter or not, and swapped parts like a different block or dipstick tube. If a “correct” refill leaves the dipstick empty, pause. Verify the engine ID and read the dipstick after a short run or a rest period.
Goal: help owners find the right fill for their engine, confirm level correctly, and avoid underfilling or overfilling through simple checks you can repeat.
Chevy 5.3 oil capacity in quarts by model year and setup
Published numbers can mislead when pan shape, dipstick calibration, or hardware differ between years. A short intro helps explain the spread and what owners should check before topping off.
Why specs vary across generations?
Generational changes such as pan design, AFM/DFM components, cooler lines, and dipstick tube length change how much fluid the sump holds. Service listings also differ by whether they count a dry fill or a service fill with a new filter.
Common ranges and red flags
Early truck V8s often land near six quarts with a filter change. Some later references list totals up to about 8.5 quarts for other iterations. If six quarts barely reaches the dipstick tip after a full drain, suspect a mismatched dipstick, swapped pan, or a different year engine.
- Confirm the engine year via VIN or serial stamp.
- Check the pan part style and dipstick/tube match.
- Trust the dipstick only if it matches the installed pan and tube.
| Era | Typical quarts | Notes |
|---|---|---|
| Early 2000s | ~6 qts | Common with filter replacement; verify dipstick |
| 2014+ examples | ~8.5 qts | Some later blocks and pans hold more; check VIN |
| Swapped engines | Varies | Mismatched tube or pan can mislead level reading |
How to check your 5.3 engine oil level the right way?
A reliable level check starts with the setup. Park on level ground and pick a consistent routine. Readings only compare if the vehicle, timing, and method stay the same.

Warm vs cold and consistent timing
Warm checks can work if you wait several minutes after shutdown so fluids drain back. Cold checks are simpler for daily monitoring.
Either is fine use the same approach every time for reliable trends.
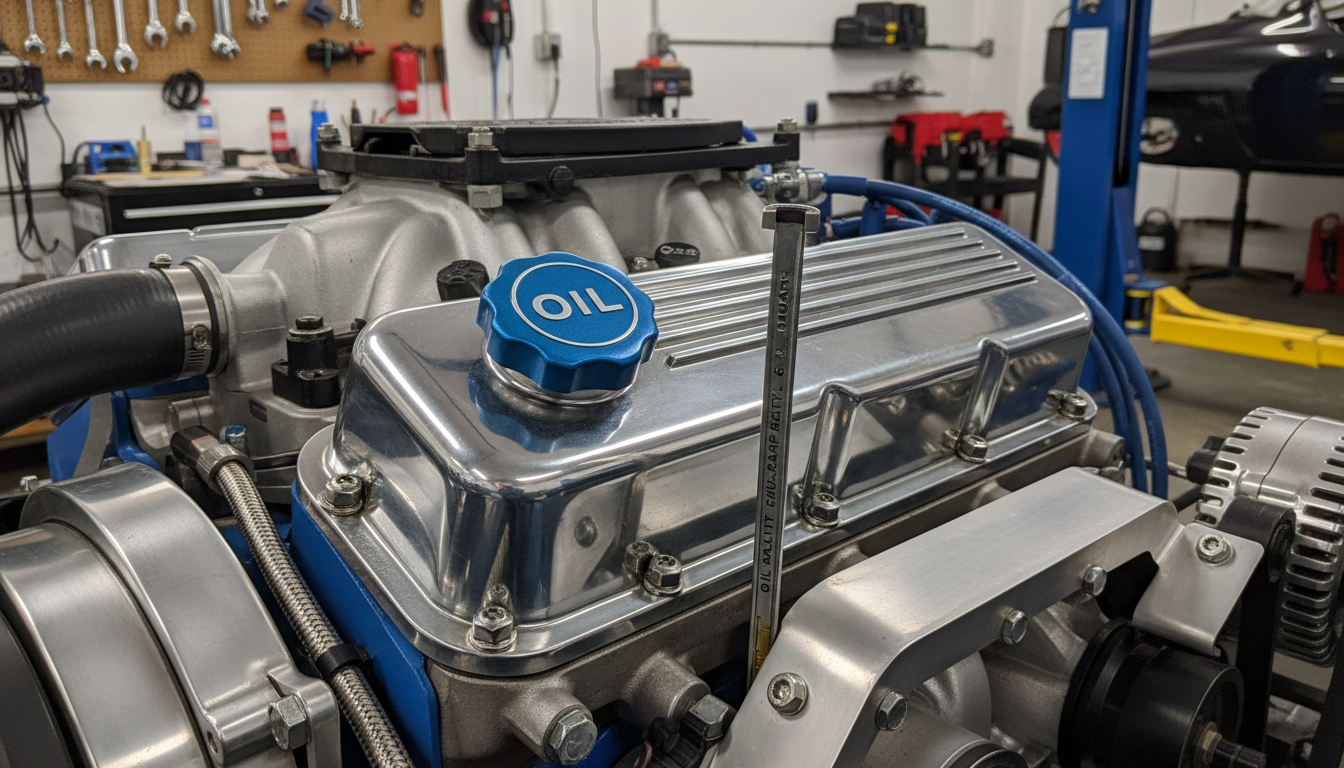
Dipstick technique and interpreting marks
Pull the stick, wipe it clean, reinsert fully, then pull again to read. Partial insertion or smeared oil can fake a high reading.
- Tip-only shows low; it may mean a true low level or a mismatched dipstick.
- The space between add and full equals meaningful volume—don’t ignore a jump from tip to full.
- A new filter must fill during first startup, so the first post-service check may read slightly lower.
| Check | When to do it | What it reveals |
|---|---|---|
| Cold dipstick | Before first drive | Consistent baseline reading |
| Warm dipstick | After short drive, then wait | Shows running level; needs drain-back time |
| After service | After startup and cool-down | Filter fill affects final level; document results |
Record each check. Note how much was added and where the mark lands to spot leaks, consumption, or calibration issues early.
How to do a 5.3 oil change and fill to the correct capacity?
Confirm the service spec with filter replacement. Always use the refill amount that states “with oil filter replacement.” The filter stores fluid, so totals change when it is swapped.
DIY flow for a consistent change: warm the engine briefly, drain the pan completely, replace the filter, and clean the drain plug and sealing surface. Use a new gasket if required.
Start with a safe initial fill, then top off
Pour a conservative initial volume, then pause. Wait for a few minutes so oil settles, then check the dipstick.
- Add small measured amounts until the dipstick reaches the full mark for that installed engine and tube.
- Use marked containers so you know exactly how many quarts were added.
After-fill checks: idle, recheck level, and watch for leaks or smoke
Start the engine and let it idle a short while to prime the filter. Shut off, wait two to five minutes, then recheck the level.
Inspect under the vehicle for leaks at the drain plug and filter. Watch the exhaust area for smoke that signals spilled fluid.
When numbers don’t line up: verify the engine by VIN
If the measured refill and the dipstick don’t match expected readings, stop. Confirm the engine year and VIN, and check that the pan and dipstick tube match the installed engine.
| Step | Action | Why it matters |
|---|---|---|
| Warm and drain | Run briefly, then drain fully | Improves flow and removes more old fluid |
| Filter replace | Install new filter before refill | Spec totals assume new filter is in place |
| Staged fill | Initial conservative fill, then top off | Prevents overfill and helps match dipstick |
| After-check | Idle, wait, recheck, inspect | Ensures correct running level and catches leaks |
Conclusion
Final checks should focus on matching the installed parts with the measured level, not on memorized totals. Confirm the correct spec for your specific engine and verify the dipstick and pan match the installed hardware.
Use published guidance for your build, fill in stages, run the engine briefly to fill the filter, then wait and recheck. Add small amounts until the dipstick shows full.
Odd readings are useful clues. A stick that barely moves after a normal refill usually signals a parts mismatch—investigate rather than ignore the sign.
When things don’t add up, check the VIN, confirm dipstick/tube and pan compatibility, and document each service. Consistent checks and clean service habits extend engine life and make future troubleshooting far easier.
FAQ
What’s the recommended Chevy 5.3 oil capacity?
The recommended fill varies by model year and configuration. Most older small-block 5.3L V8s take about 5 to 6 quarts with a filter change, while some later variants and trucks require roughly 6 to 6.5 quarts. Always check the owner’s manual or the underhood sticker and confirm with the VIN-specific service information before topping off.
How does oil capacity in quarts differ by model year and setup?
Capacity varies with oil pan size, whether the engine has active fuel management, and factory or after-market pans. Light-duty passenger vehicles often sit near the lower end, while trucks and models with deeper sumps need more volume. Transmission or towing packages don’t change engine volume but can indicate a heavier-duty pan that does.
Why can published oil amounts differ between 5.3L engine listings?
Manufacturers publish different numbers depending on measurement method (cold vs. warm), whether the filter is included, and the specific engine variant. Revisions across model years and emissions-related parts also alter internal clearances, producing a different fill requirement.
What is the common factory fill range for older 5.3s with filter replacement?
For many earlier 5.3 engines, a typical factory-recommended range is 5 to 6 quarts when replacing the oil filter. That covers most passenger-car and light-truck configurations with standard oil pans and conventional filters.
Are there newer 5.3 examples with higher capacity and what does that mean for owners?
Yes. Some later engines and truck-focused variants use deeper pans or different oiling components, pushing capacity to about 6 to 6.5 quarts. Owners should use the correct quantity to maintain oil pressure and cooling; underfilling risks wear, overfilling can cause aeration and seal issues.
What’s a real-world red flag when 6 quarts barely reaches the dipstick tip?
If pouring six quarts barely shows on the dipstick, suspect a larger sump, an incorrect dipstick, or a previous swap. Don’t keep adding blindly—verify pan size and dipstick part number, then measure level after the engine is warm and settled.
How can engine swaps and mismatched dipsticks confuse reported capacity?
Swapped engines may come with a dipstick calibrated for a different pan depth. That leads to misleading readings and incorrect fill volumes. Confirm the dipstick part number and compare oil pan physical depth to OEM specs when uncertainty exists.
How should you check your 5.3 engine oil level the right way?
Park on level ground, run the engine until normal operating temperature, then shut it off and wait 5–10 minutes for oil to drain to the pan. Use the correct dipstick, wipe it, insert fully, then remove to read. This sequence gives the most consistent warm reading.
Should you check warm or cold and when is timing important?
Warm checks after a short cool-down are preferred because they reflect operating volume. Cold readings (engine off and long-cooled) differ due to trapped oil in galleries. Be consistent: always measure at the same warm/cold state to track consumption accurately.
How do you read dipstick marks and what does “just a drop” mean?
Dipsticks show low and full marks or a crosshatched zone. If oil only wets the lower mark or shows “just a drop” on the tip, the level is low and needs topping. A single drop can indicate the difference between safe and underfilled—top to the center of the safe zone, not over the full mark.
How do you perform a 5.3 oil change and fill to the correct amount?
Drain the oil, replace the filter, then refill. Start with the manufacturer’s recommended amount for your engine variant, usually noting whether that includes the filter. After initial fill, run the engine briefly, shut off, wait, and recheck. Add small amounts to reach the proper mark—do not exceed the full zone.
Why confirm capacity “with oil filter replacement” before you pour?
Filter capacity holds additional oil. Published fills often state “with filter” because the total system volume includes that trapped oil. Filling without accounting for the filter can leave the system underfilled.
What’s a safe initial fill strategy before topping off?
Pour the recommended baseline amount, then run the engine for 30–60 seconds to circulate oil. Shut off, wait a few minutes, and check the dipstick. Top in small increments (a few ounces) until the proper level shows. This prevents overfill and foaming.
What after-fill checks should you perform?
After filling, inspect for leaks at the drain plug and filter, start the engine to confirm oil pressure, watch the gauge or dash light, and recheck the dipstick after the engine rests a few minutes. Smoke, oil smell, or unusual noises merit immediate shutdown and inspection.
When should you verify the engine’s year or VIN if capacity doesn’t match expectations?
If measured volume and dipstick readings conflict with published figures, verify the engine code and VIN. That confirms the exact variant and options. Discrepancies often trace to swapped components or revisions tied to specific build dates.